Sampler
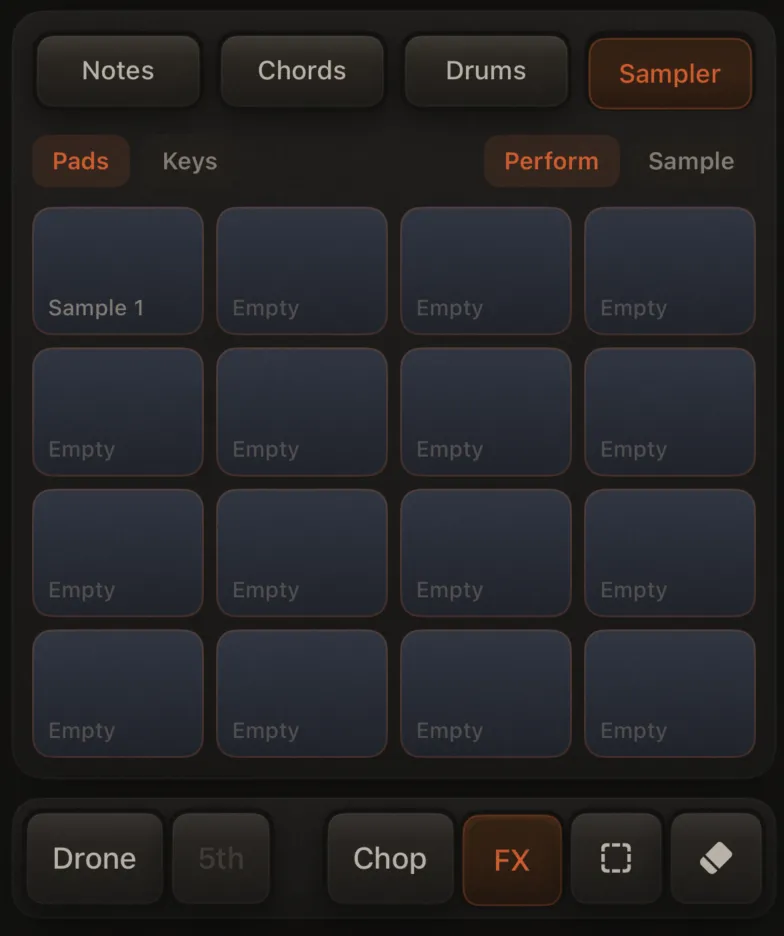
The Sampler is ARC-24's fourth performance surface: a fixed 4×4 grid (sixteen pads) of your own audio per song. Import files or record from the mic, play one-shots or Keys mode, and overdub onto any armed track (T1–T8).
Everything you do with samples — assigning, editing, Pads/Keys, Set Source, Set Root, Chop, and Clear — happens right on the Sampler performance screen. There's nothing to set up in Sound Design.
Tracks become sample tracks automatically
You don't pick "Synth" or "Sample" anywhere. A track simply follows what you do:
- An empty track becomes a Sample track the moment you enter Sampler mode and record (or perform) pad hits on it.
- Once a track has a recorded synth or drum part, it stays that type — and the Sampler screen shows a banner instead of the pads, with shortcuts to Use T[N] (jump to the next empty track — or an existing sample track when none are free) or Clear Track [N] (delete the loop, after a confirmation, so this track can be reused). The reverse is also true (a recorded sample track stays a sample track until you clear it).
- Tapping a track that already holds recorded sample hits automatically switches the performance surface to the Sampler, so the pads always match the selected track.
Sample audio files are song-wide (shared by all loops). Each loop remembers which tracks hold sample parts, the Pads vs Keys layout, the Keys mapping, Speed / Length, and the Keys source pad.
Perform vs Edit
A toggle at the top-right of the grid sets what tapping a pad does:
| Mode | Tapping a pad… |
|---|---|
| Perform | Plays the pad (normal performance) |
| Edit | Opens that pad's settings sheet (import / record / edit / clear + shape knobs) |
When you first enter Sampler mode with no pads loaded, the toggle is hidden and you're placed in Edit mode so you can assign sounds right away — the header shows a "Tap a pad to add a sample" hint instead. The toggle appears once at least one pad has a sample (and starts on Perform); clearing the last pad hides it again and returns you to Edit mode.
Pads | Keys and the Perform/Edit toggle share the header row. Pads/Keys only appear in Perform mode.
Assigning & editing pads (Edit mode)
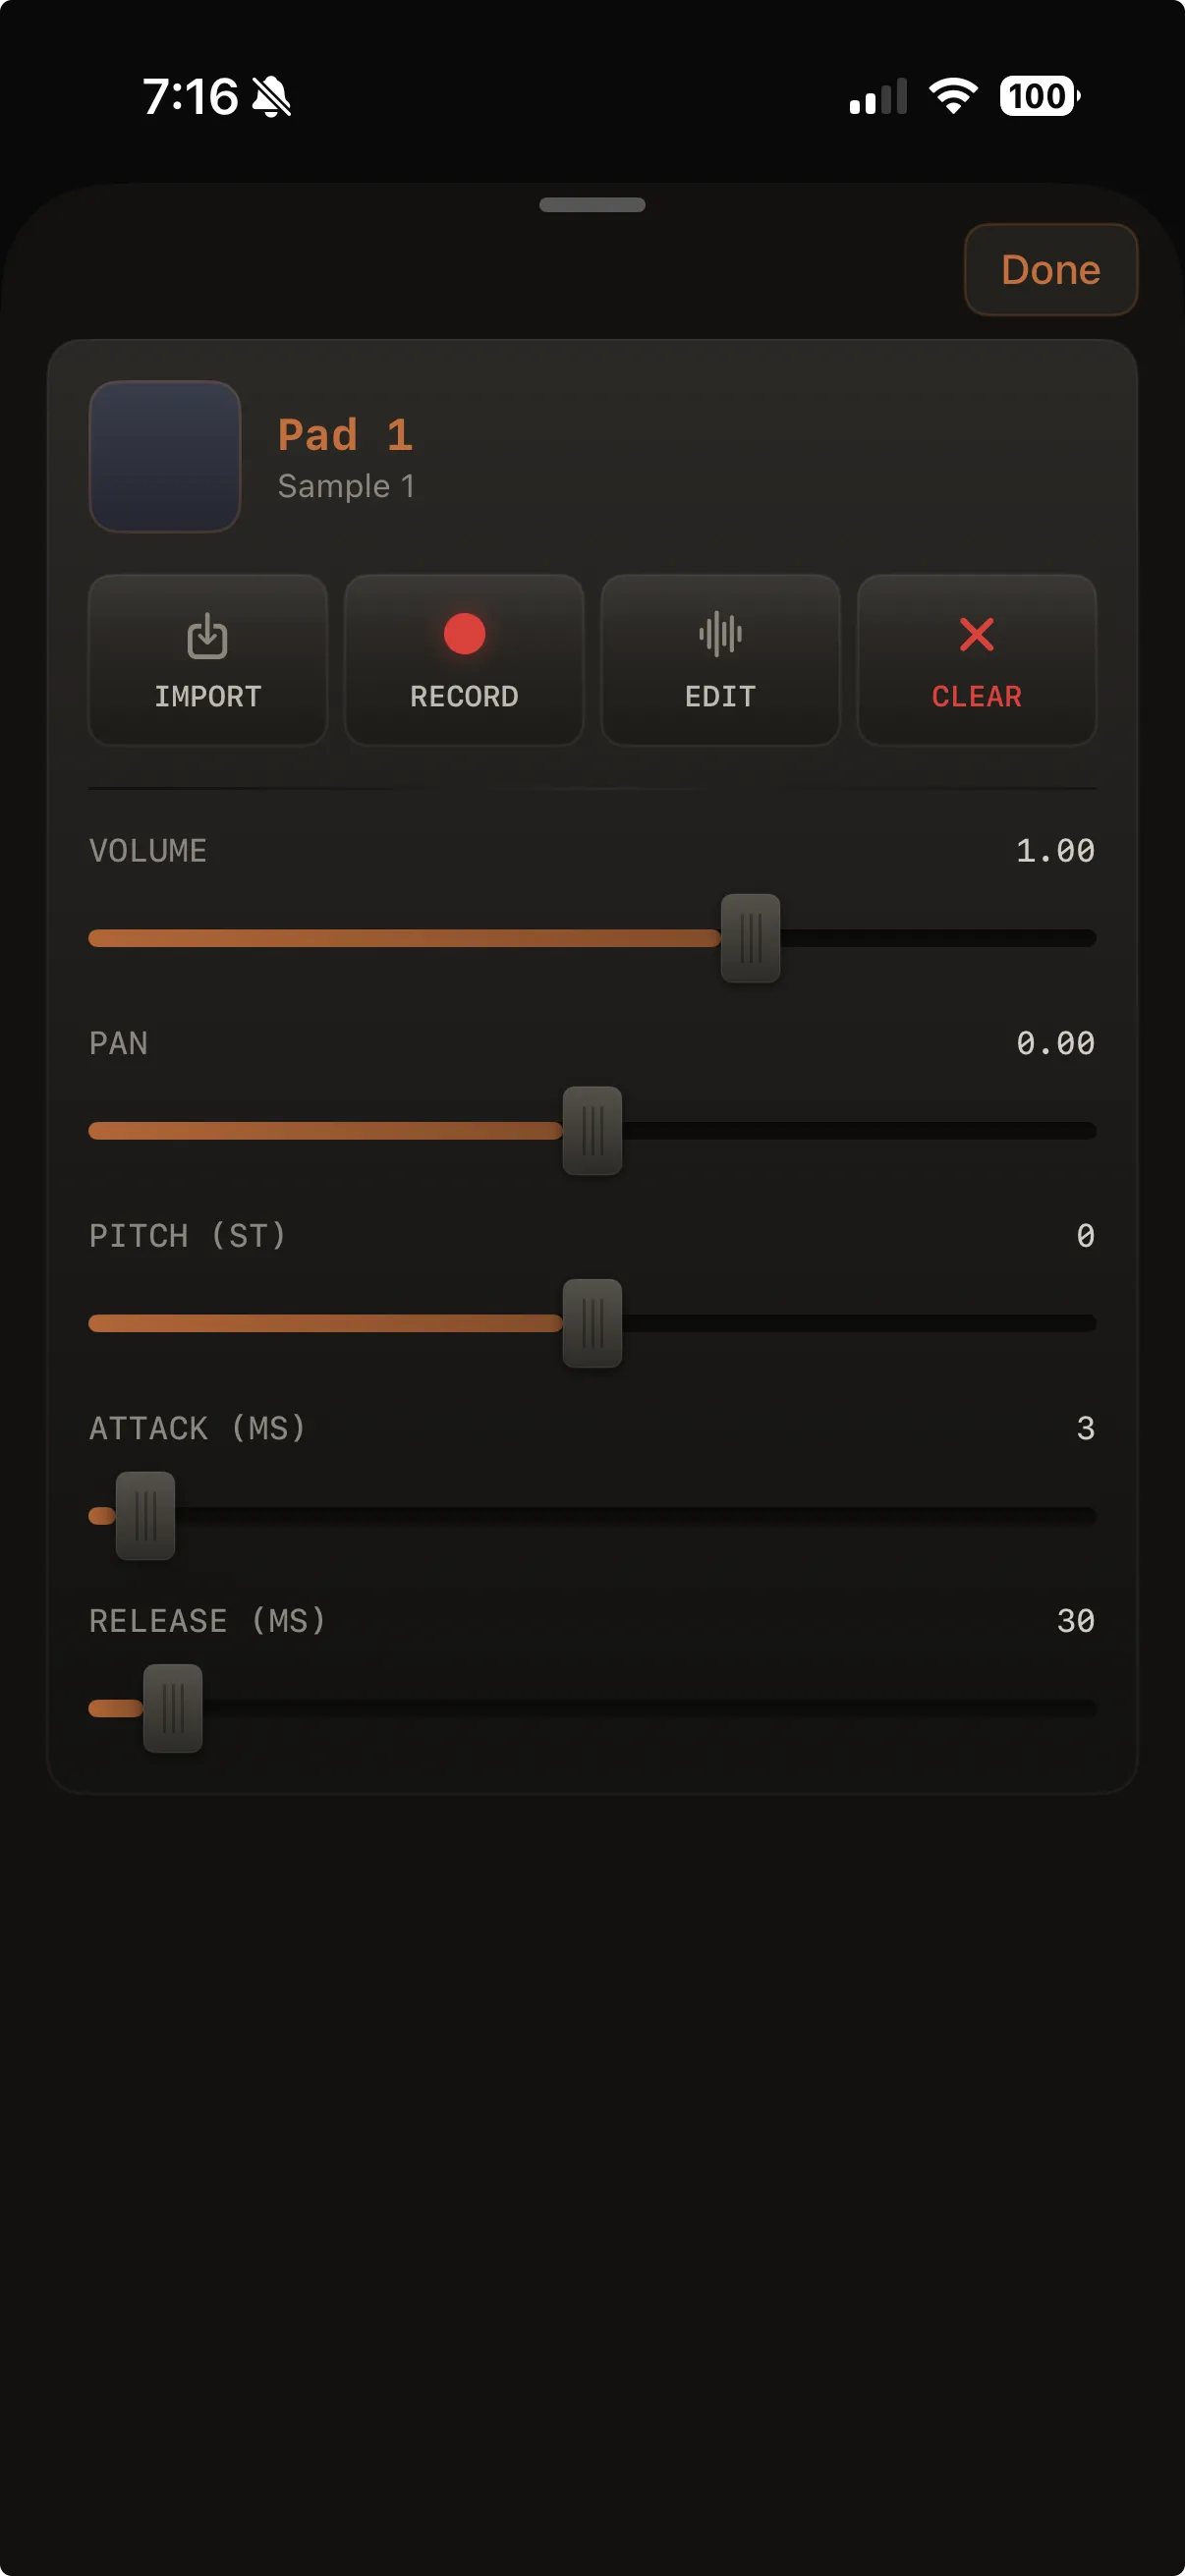
Switch the toggle to Edit, then tap a pad. This opens the pad settings sheet — the first of two screens you use to work with samples.
- iPhone: sheet over the performance screen
- iPad: centered modal window
Tap Done when you're finished on this screen. Changes to the shape knobs apply immediately; import, record, and edit work is saved from the second screen (below).
Pad settings (screen 1)
| Area | What you can do |
|---|---|
| Import | Choose Files or Videos. Files accepts WAV / AIFF / CAF / M4A / AAC / MP3 / FLAC and video (MOV / MP4). Videos picks a clip from your camera library and imports its audio track. Both open the import / trim screen. Clips longer than 10 minutes are rejected. |
| Record | Opens the record / trim screen (mic capture with an INPUT LEVEL meter) |
| Edit | Opens the trim / tempo screen for a pad that already has a sample (disabled when empty) |
| Clear | Remove the sample from this pad immediately — no second screen |
| Shape | Volume, pan, pitch (±24 st), attack, and release knobs — drag up/down to adjust, double-tap to reset one; adjusted here only |
Tap the mini pad preview (when a sample is loaded) to audition the pad with your current shape settings.
Import, record, or edit (screen 2)
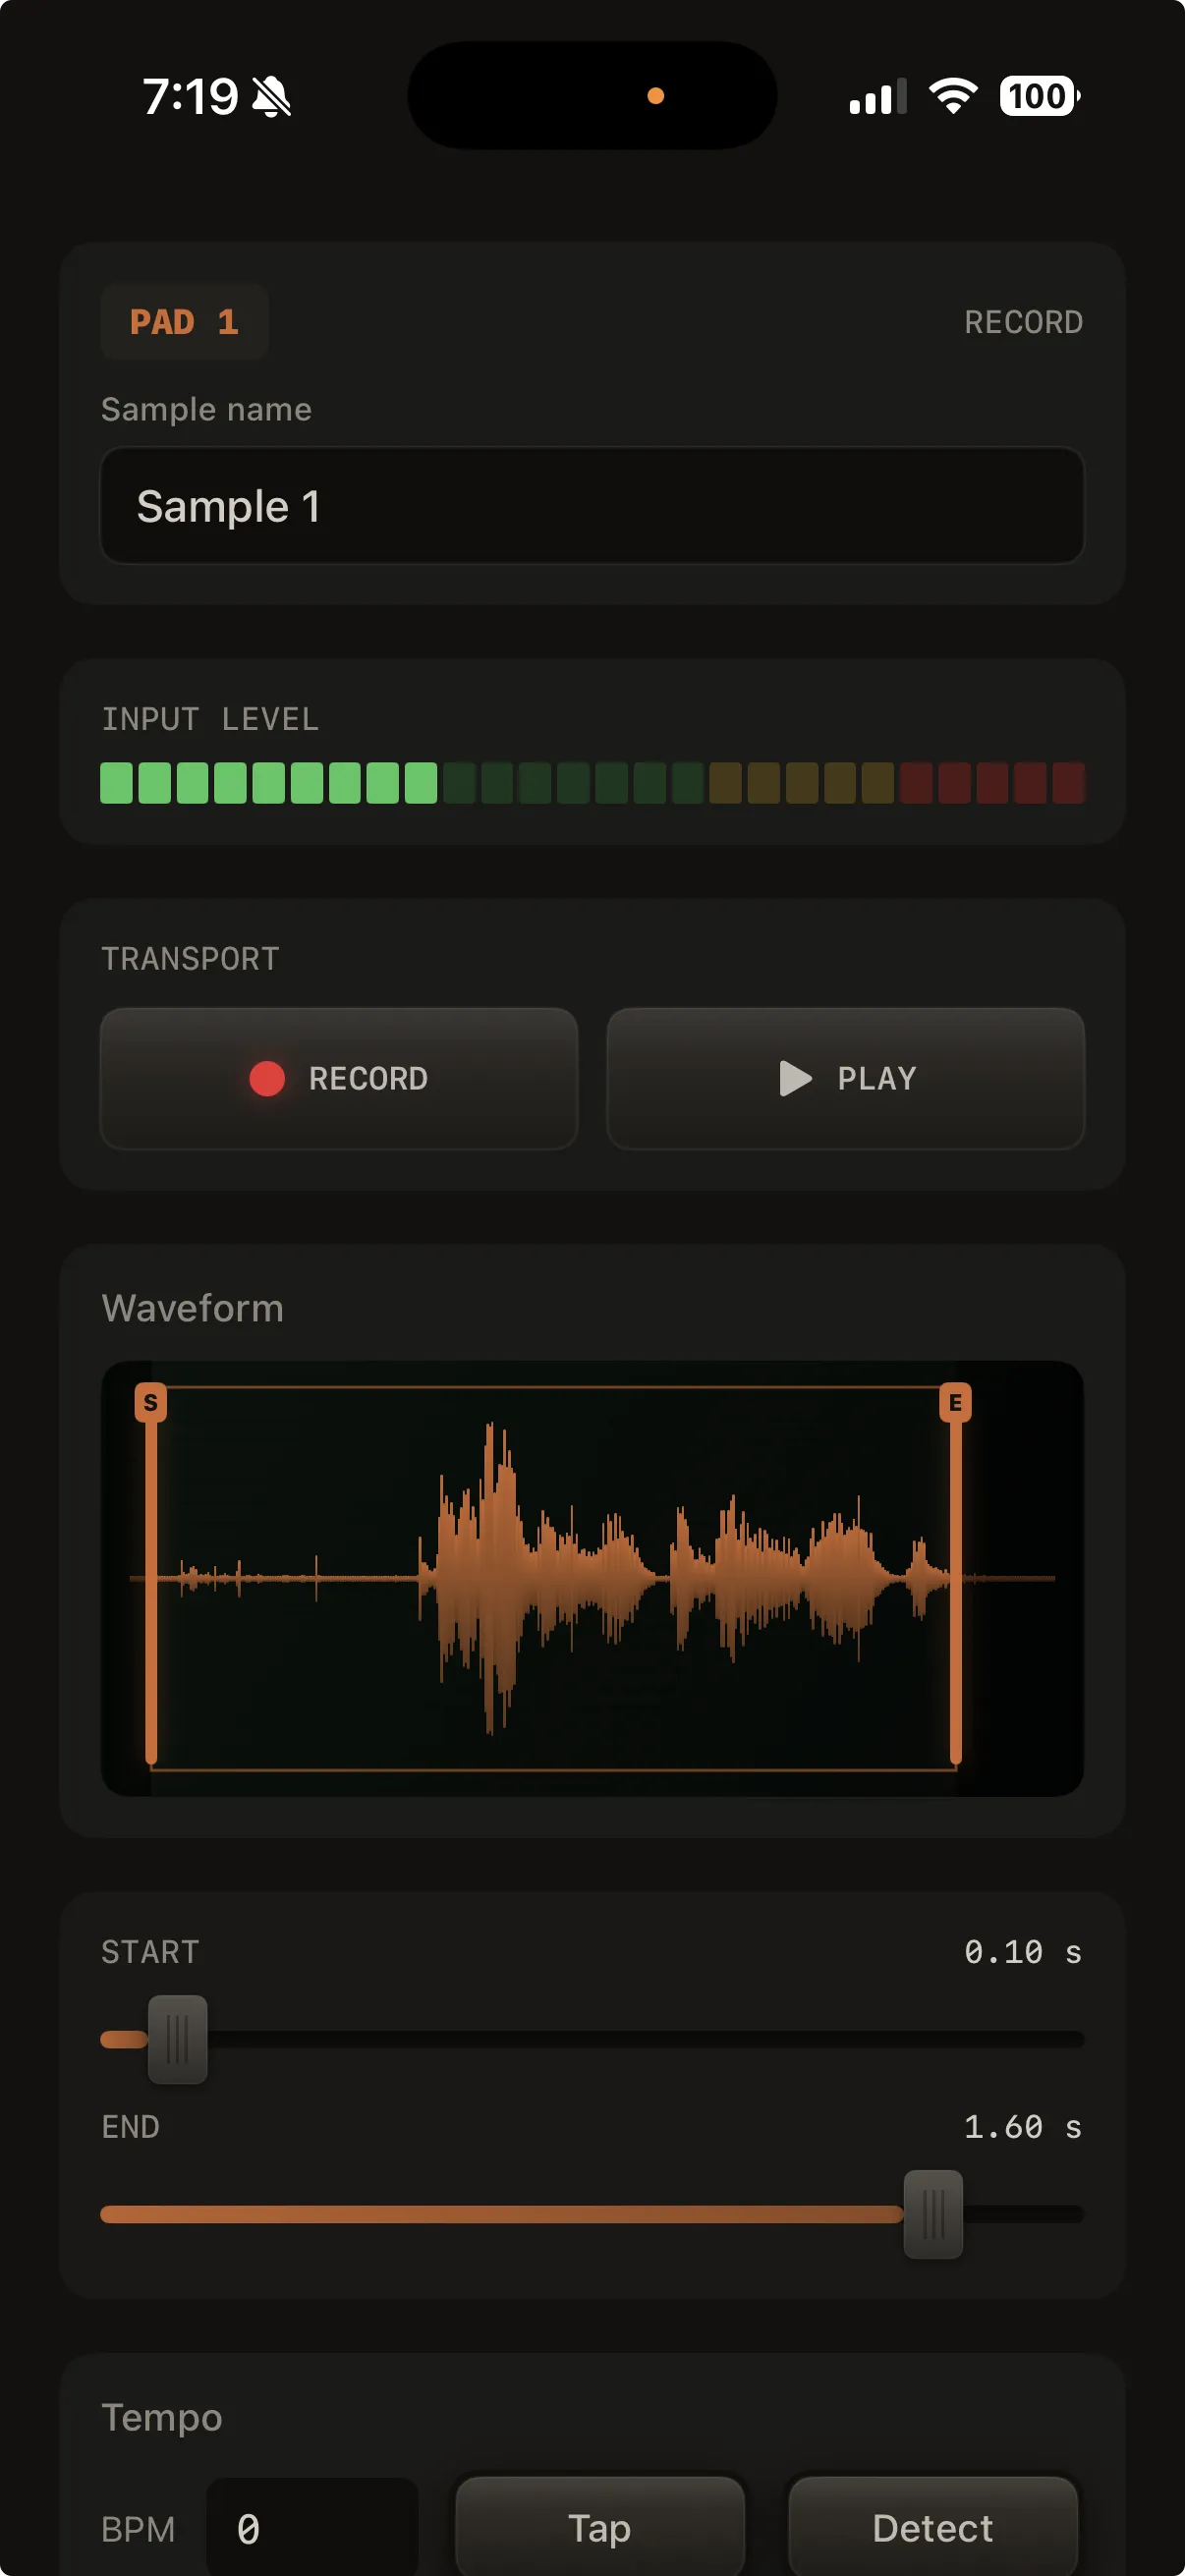
Tapping Import, Record, or Edit on the pad settings sheet opens a second screen for working with the audio file itself:
| Area | What you can do |
|---|---|
| Record (Record only) | Record / Stop transport, INPUT LEVEL meter, and an optional metronome (see below) |
| Waveform | CRT waveform with draggable Start / End trim handles (and numeric Start/End sliders) |
| Preview | Play / Stop to hear the trimmed region |
| Tempo | Set the sample's original BPM (type, Tap, or Detect), then Sync to song tempo to time-stretch it to your song |
| Save | Assign to Pad (after import or record) or Save (when editing an existing sample) — returns you to pad settings |
Import opens the system file picker first; once you choose a file, the trim/tempo screen appears. Record and Edit go straight to that screen.
This screen does not include volume, pan, pitch, attack, or release — set those on the pad settings sheet.
Record metronome
On the Record screen, a metronome icon sits on the Transport row — the same icon as the timeline click. It is off by default.
- Tap the icon so it highlights (accent orange)
- Tap Record — the click starts with the take, at your song BPM, with the same accented down-beat as the main metronome
- Tap the icon again to turn it off, even mid-take
This is not the timeline metronome. It only clicks while you are capturing a sample, it does not follow the control-bar metronome setting, and it is not saved with the song.
Use headphones if you don't want the click in the recording — through the speaker, the mic will pick it up.
First assign on an unsaved session: ARC-24 creates a song automatically so files can be stored with the project. On an already-saved song, samples are added to that project.
Changing the song tempo later
Sync to song tempo stretches the sample once, at the song tempo in effect when you save. If you change the song BPM afterwards, synced pads keep playing at the old stretch — they don't re-time automatically.
To re-time a synced pad after a tempo change:
- Switch to Edit and tap the pad to open its settings
- Tap Edit to open the trim / tempo screen
- Tap Save — the stretch is recalculated against the current song tempo
Repeat for each synced pad. Pads without Sync to song tempo are unaffected by BPM changes.
Channel effects: EQ and all FX (tone reverb, Atmosphere, Character, delay, inserts) for a sample track are in Mixer → FX, exactly like a synth track — there's no separate sampler mixer strip. Use the normal T1–T8 strip, or tap FX in the extras row on the performance screen (same sheet as Mixer → FX).
Pads layout (Perform)
Each pad triggers its assigned sample as a one-shot — it plays from the Start trim point to the End trim point, then stops. Empty pads show Empty.

Keys layout (Perform)
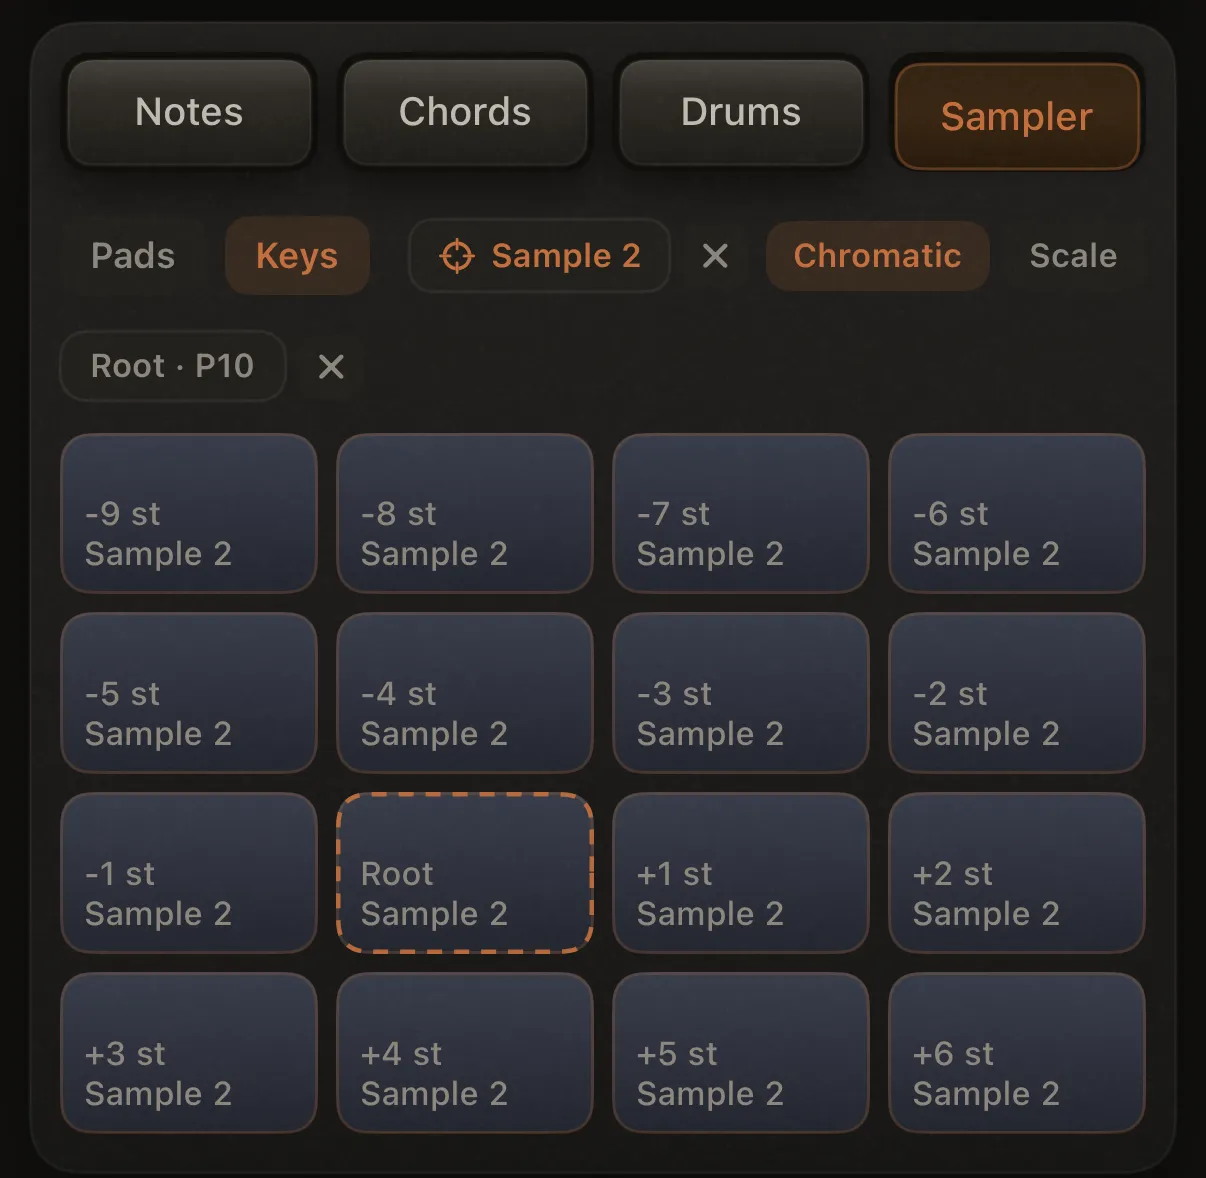
Keys plays one source sample across all sixteen pads, pitched relative to a root pad. Keys is Perform-mode only, and its controls sit on the header row (in place of the Perform/Edit toggle):
| Control | What it does |
|---|---|
| Pads | Keys | Switch layout (per track, saved with the loop) |
| Set Source | Tap to arm Pick source…, then tap a highlighted loaded pad to choose which sample Keys plays |
| Scale / Chromatic | Keys mapping (see below) |
| Set Root | Appears once a source is set — Pick root…, then tap a pad to assign the root; × clears it |
| Speed / Length | How Keys pitches the source (see below). On the Set Root row |
Until you set a root, the source pad acts as the root (unison). Tapping the root pad always plays — it doesn't clear the root. The effective root pad shows a dashed orange ring.
Pad labels show interval + sample name (e.g. +M3 / -P5 in Scale mapping, or +3 st in Chromatic).
Keys mapping (Scale vs Chromatic)
| Mode | Behavior |
|---|---|
| Chromatic | Each pad step = one semitone (keyboard-style) |
| Scale | Each pad step = one scale degree in the loop's key and scale (more musical, in-key steps) |
Mapping follows your loop's key/scale from Setup. Changing key or scale updates Scale-mode pitch live.
Keys playback (Speed vs Length)
Speed | Length sits on the Set Root row (right side), once a source pad is assigned. Both Scale and Chromatic use this setting. It is per track and saved with the loop. Default is Length.
Both modes change the note. They differ in whether the sample's duration follows that note:
| Mode | Behavior |
|---|---|
| Length | The note changes; the sample stays the same length as the source pad (the same trim you hear in Pads). Higher and lower Keys pads hold that length. The first tap of a new interval may briefly use Speed until the pitch-shift is ready |
| Speed | Classic sampler / tape pitch — higher notes play faster and shorter, lower notes slower and longer |
The root pad always matches Pads — same file, same trim, same length. Compare other Keys pads to the root if you're checking Length.
Pads-mode pitch and Chop are unchanged. Very long source trims (over ~45 seconds) stay on Speed.
Recording sampler loops
- Enter Sampler mode and select a track tab (T1–T8)
- Arm the track (same as Notes — the empty track auto-types to a sample track)
- Press Play
- Tap pads — hits record onto that track's loop
Use per-track quantize and humanize in Sound Design → Track → Recording (same controls as synth tracks).
Loop events store the pad index and Keys root pad (so playback pitch matches what you played in Keys mode).

Chop
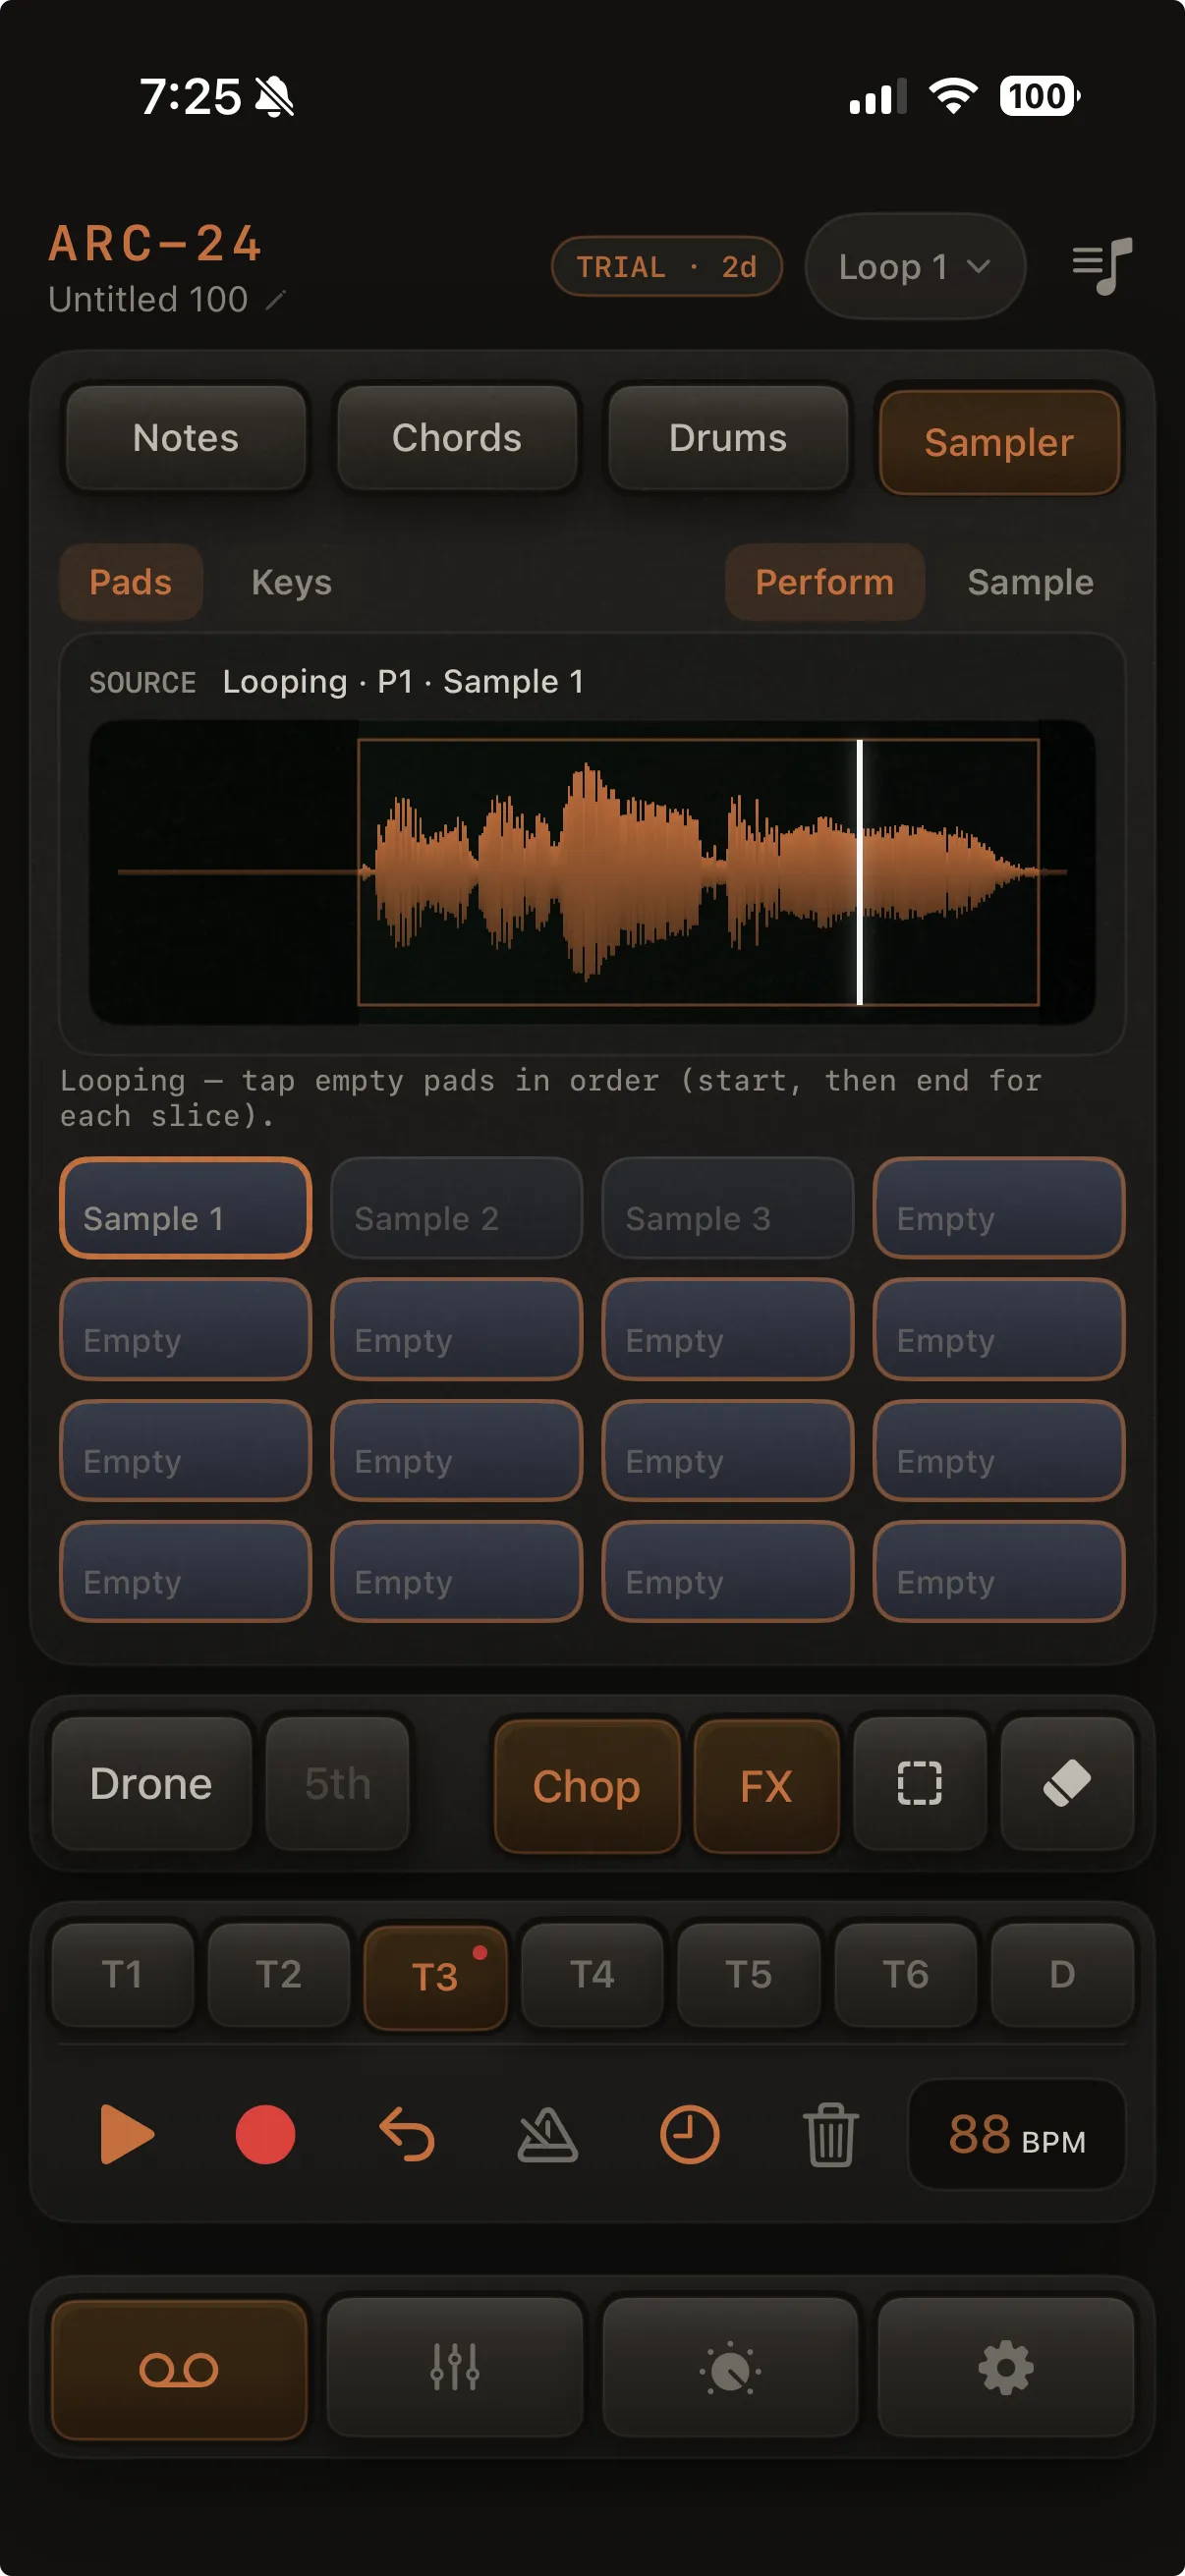
Sample chopping splits one loaded pad into several smaller pads, each playing a slice of the same audio. Use it to pull individual hits out of a loop, break, or long recording — without leaving the performance screen or re-importing files.
Turn Chop on from the extras row — the scissors icon (Pads layout only; at least one pad must already have a sample). Tap a source pad to loop its sample while you work, then tap empty pads on the beat to mark where each slice starts and ends. Each slice becomes a one-shot on the pad you armed. The original source pad is never changed; chopped pads share the same file with different trim regions. Chop is session-only — it isn't saved with your song.
The chop screen stays minimal: just the waveform and your pads. While Chop is on, a How To button appears at the right of the header row (where Perform / Edit normally sits) with a step-by-step refresher; a short message appears below the waveform only if something goes wrong (for example, tapping a pad that already has a sample) and fades on its own.
| Step | Action |
|---|---|
| 1 | Toggle Chop on — the scissors icon in the extras row (enabled when at least one pad has a sample) |
| 2 | Tap a source pad — waveform loads and the sample loops within its trim region |
| 3 | Tap empty pads in order on the beat — the first tap arms a slice start (orange dashed ring); the next tap ends that slice and assigns it to the armed pad (e.g. tap P6, then P7 → P6 gets the region between those taps). If the preview loops before you tap an end mark, the armed slice is saved automatically from its start mark through the source trim end |
| 4 | Tap the source pad again or turn Chop off to stop the preview (an armed-but-uncommitted pad is discarded) |
Rules:
- Two taps per slice — the first tap only arms the pad; audio is assigned on the next tap
- Sequential pads work — tap P6 to arm, tap P7 to finish P6 and arm P7, and so on
- Loop wrap auto-save — if the preview cycles before you tap an end mark, the armed slice is saved from its start mark through the source trim end
- Catching the top of the loop is forgiving — taps are compensated for audio output latency, and an arm tap landing just before or just after the loop wraps snaps to the very beginning of the region (so you can grab the downbeat without splitting hairs on timing)
- Empty destination pads only — loaded pads are ignored (a brief message below the waveform explains if you tap one)
- Chopped pads share the source file with different trim regions (clearing a pad deletes the file only when no other pad still references it)
- Chop, Clear pad, and Erase are mutually exclusive
- Loop recording is blocked while Chop is on
- Not available in Keys layout — switch to Pads first
Clear pad (performance)
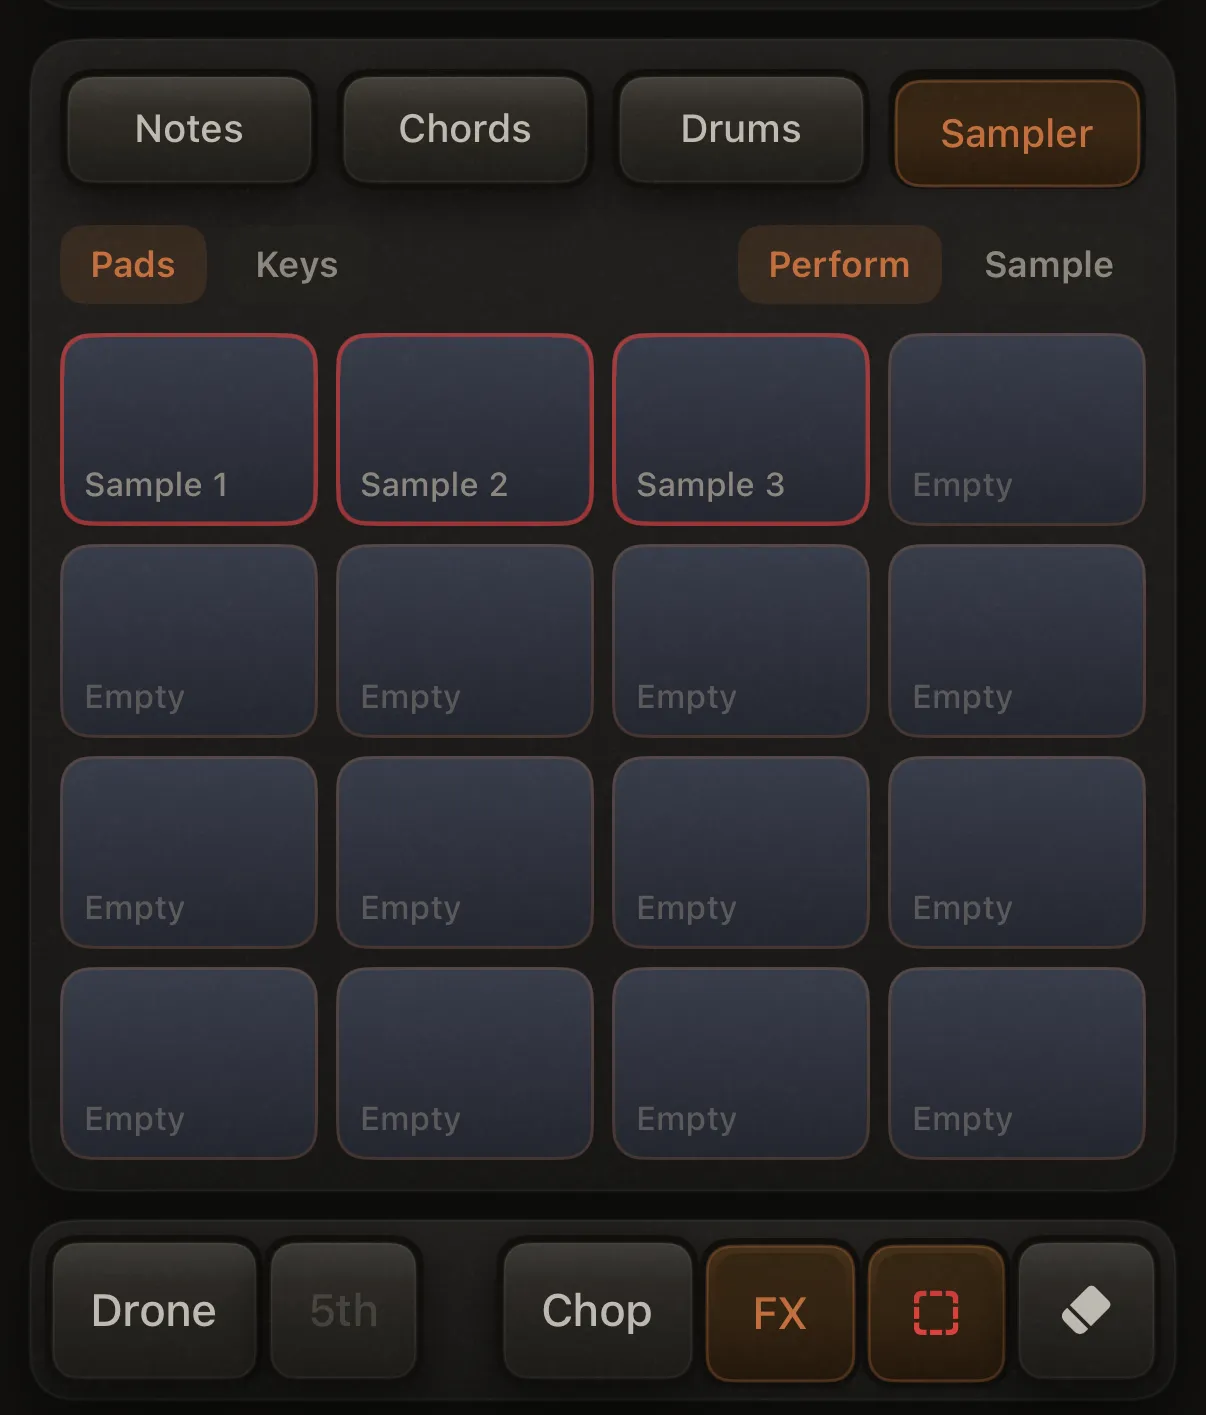
On the Sampler screen, the extras row shows a dashed-square icon between Chop and Erase.
| Step | Action |
|---|---|
| 1 | Tap the Clear pad icon (highlights when on) |
| 2 | Tap a loaded pad — its sample is removed from that pad |
- Empty pads are ignored
- Shared files are kept until no pad still references them
- Clear pad, Chop, and Erase can't be on at the same time
- Session-only toggle — not saved with your song
Use Clear pad to free a pad quickly during performance. Use Erase (hold while playing) to remove recorded loop hits, not the sample itself.
Erase
With Erase on and playback running, hold a sampler pad to remove matching hits on the armed sample track (same playhead-scrub model as Notes and Drums). Erase does not remove the sample — use Clear pad for that.
Tips
- Save As copies the sample folder to the new song; loop recordings are per-loop (duplicating a loop does not duplicate audio files).
- Tempo sync bakes a stretched file at save time; if you change the song BPM later, re-open each synced pad's Edit screen and hit Save to re-time it (see Changing the song tempo later).
- Detect estimates a sample's BPM from its rhythm — handy before turning on Sync to song tempo. If a sample has no clear pulse, set the BPM by hand or tap it in.
- Sync to song tempo needs a known original BPM — the toggle is disabled until a BPM is set (type, tap, or Detect).
- Use wired headphones or speakers when recording tight loops — Bluetooth adds latency.
- When recording a sample with the metronome on, headphones keep the click out of the take.
- Length (Keys) keeps every pad as long as the source; Speed is the tape-style option if you want higher notes to race.
- MIDI — with Enable MIDI Input on, consecutive notes from Setup → MIDI → Pad Base Note trigger the sixteen pads (Pads = sample hits; Keys = pitched source, using the same Speed / Length setting). See MIDI input.
Related
- Recording
- Erase mode
- MIDI input
- Mixer — channel EQ and FX for sample tracks
- Songs, loops & arrangement